One of the things I love the most with AWS is auto-scaling. You choose an AMI, set some parameters and AWS will spin instances up and down whenever a threshold is breached.
But with all these instances spinning up and down there are some unknowns. For example, what is the IP address of the new instance? Its host name? This can be critical when other components of your infrastructure are dependent on knowing these parameters. I had this problem when I started to use Zabbix as the monitoring system. At first it seemed like a complicated one, but Zabbix has a wonderful feature called Auto Registration which can be used exactly for this situation.
I will try to show how to configure auto registration both on the client (EC2 instance running Ubuntu 14.04) and on the Zabbix server (Zabbix Server 2.4.2).
Zabbix-agent Installation and Configuration
Let’s start with installing zabbix-agent on the Ubuntu client:
1
2
| $ sudo apt-get update$ sudo apt-get install -y zabbix-agent |
The zabbix-agent will install its configuration file to /etc/zabbix/zabbix_agentd.conf. Edit the file with your favorite text editor and make the following changes to the file:
1
2
3
4
| Server=host name or IP address of the Zabbix serverServerActive=host name or IP address of the Zabbix server#Hostname=Zabbix server (Make sure it is commented out so you get the actual host name)HostMetadata=Test |
Take a good look at the last option (HostMetadata). I have set it to “Test” but you can set it to any string you like. This is the information that the new instance will send to the Zabbix server when it starts, and as we shell see, it will be used to auto register the host.
Last, lets restart the zabbix-agent service:
1
| $ sudo service zabbix-agent restart |
By default, the zabbix-agent will listen on port 10050/TCP for connections from the Zabbix server. Make sure that the Zabbix server can access the client on this port.
Auto Registration Configuration
Login to your Zabbix server dashboard and navigate to Configuration | Action. In the Event source (1) select Auto registration and then press on Create action (2):
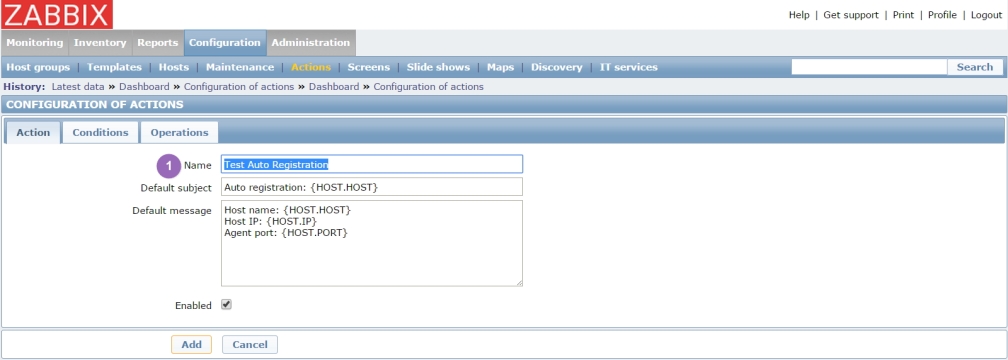
In the Action tab give a name for the action (1):
In the Conditions tab create a new condition where Host metadata is equal to the Hostmetadata that was configured in the agent configuration file (1) and add it to the conditions (2):
In the Operations tab you can set actions to be taken when the host auto register itself. In the following example the host with the “Test” metadata will be automatically added and also linked to the OS Linux template (1). To finish and add the action press on Add(2):
By default, the Zabbix server will listen on port 10051/TCP for incoming connection from its clients. Make sure that the client can access the Zabbix server on this port.
With the Zabbix client and server configured we can either wait for the zabbix-agent to register itself, or restart the zabbix-agent if we are impatient. In the end, you will see that the new host had registered itself in the server.
The host metadata is a very powerful feature. In my case, I have a number of different auto-scaling groups. For each group I use a different value for the host metadata. So, when the instances register themselves on to the Zabbix server each of them will be linked to the relevant templates based only on the value of the metadata.
One more thing, you will need to take care of the removal of the host from the Zabbix server when the auto-scaling group terminate the instance. I use a Python script, which utilize the Zabbix server APIs, to remove the instance from the Zabbix server when it is terminated by the auto-scaling group . The script is triggered when the OS is shutting down by using a shutdown script located under the /etc/rc0.d directory.


This comment has been removed by the author.
ReplyDeleteNice Info Regarding Zabbix, AWS and Auto Registration my sincere thanks for sharing this post please continue to share this kind of post Please continue to share this post
ReplyDeleteAWS Training in BTM Layout || AWS Training in Marathahalli
I will definitely follow these tips. Thank you for sharing such detailed article.
ReplyDeleteAWS Jobs in Hyderabad .
That's really fascinating; you're an extremely experienced Heroku Vs Aws. I've discussed your site during my internet sites! An extremely good manual. I'll certainly adhere to these pointers. Thanks with regard to discussing this kind of comprehensive post.
ReplyDeleteYou stole this from here, word for word: https://devopstrailer.wordpress.com/2015/06/11/zabbix-aws-and-auto-registration/
ReplyDeleteThanks For Sharing The Information The information shared Is Very Valuable Please Keep Updating Us Time just went On reading The article Python Online Training Aws Online Training Hadoop Online Training Data Science Online Training
ReplyDeleteThanks for sharing. Great post very Informative, also checkout Cal Auto License of San Marcos
ReplyDeleteCan you share your python script to unregister th host with a Zabbix API call ?
ReplyDeleteThanks a lot.